It's common to place the doorbell's transformer in the attic and connect it to an existing power source such as a ceiling light box or an attic outlet. In short, the.
Table of contents
- How to Connect Doorbells
- Step 1: Charge and install the included battery
- How to Wire a Doorbell (with Pictures) - wikiHow
Return to the Ring app, select your local Wi-Fi network and enter the password to connect. Now your Ring Video Doorbell 2 is online. Before removing your existing wired doorbell, make sure you've turned off power at the circuit breaker. At this point, you can uninstall your old doorbell and set it aside. Not sold on the Ring Video Doorbell 2? Here's an overview of Ring's complete DIY doorbell lineup:.
Your existing drill holes might not line up with the four screws needed to mount the Video Doorbell 2. Use an electric drill to create the holes. When in doubt, hire a professional or ask an experienced friend to help. Connect the two doorbell wires to the two screws on the back of the Video Doorbell 2.
It doesn't matter which wire connects to which screw. If the wires are too short, use the wire extenders provided by Ring. Make sure they're connected and mount the doorbell using the included screws.
How to Connect Doorbells
Use wall anchors if you're installing the buzzer on brick, stucco or concrete. Attach a faceplate to complete your hardware installation.
Ring includes both a satin nickel and a venetian antique bronze faceplate with your purchase. You can use them interchangeably, depending on the style you want to achieve. Go back to your breaker panel and switch power back on to your doorbell wiring. That's it -- you've just installed your Ring Video Doorbell 2. If you aren't wiring this doorbell, follow all of these steps except the ones dealing with wires. Want more information about how this doorbell compares to other smart buzzers?
- a utility hook up or work order dated within 60 days of the application.
- Step 2: Download the Ring app on your phone.
- Want FREE Home Tips & Hacks?.
- How to install the Ring Video Doorbell 2?
- .
Be respectful, keep it civil and stay on topic. We delete comments that violate our policy , which we encourage you to read. Discussion threads can be closed at any time at our discretion. Don't show this again. Install the Ring Video Doorbell 2 in a flash. You may find it necessary to drill a couple of holes and use a fish tape to snake the wire down the wall to the button location.
Run the three-stranded wire from the chime to the location of the transformer. You may find it necessary to drill additional holes and use the fish tape as mentioned above.
Step 1: Charge and install the included battery
Position the chime in the desired location on the wall and plumb with a small level. Using a pencil, lightly mark the location of the mounting holes on the wall. Affix the chime to the wall using plastic anchors, toggle bolts, or similar wall anchors. Often, manufacturers include them with a doorbell kit. The type of wall surface -- drywall, masonry, or wood -- will dictate the type of anchor required. Drill applicable sized holes in the wall at the mounting hole locations and use the applicable type screws to secure the chime to the wall.
It is important to remember to make sure to fish the door chime wire installed earlier through the back of the chime before securing it to the wall. A doorbell system requires that it be wired correctly to function properly. It is important to note the manufacturer's wiring instructions should supersede those mentioned here. Most single button installation kits are manufactured with the option of adding a second button for another entrance in the future as a convenience.
As such, the chime is supportive of two buttons, hence the three wires. Whether or not you are using a second button, it is a good idea to wire the chime accordingly.
How to Wire a Doorbell (with Pictures) - wikiHow
Three terminals on the chime are labeled F, T, and B, which represent the front door, back door, and transformer. Loop the black wire around the T terminal, the red wire to F terminal, and the white wire to the B terminal and tighten the terminal screws using a screwdriver.
- free online dating in portland oregon.
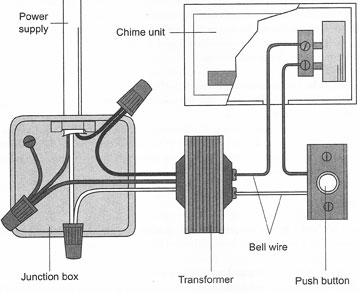
- Understanding Each Part of a Wired Doorbell System.
- You have successfully subscribed! Thanks from the HomeTips Team..
- free dating site in the us.
Install the chime cover to complete installation of the door chime. Remove the outer sheathing of the two-stranded doorbell wire to expose a red and white inner wire. Secure the white wire to the top terminal and the red wire to the bottom terminal located on the back of the doorbell button.